Before you can publish your website, you must have WebEasy ‘build’ it by converting the WebEasy document into files that work on the Web. WebEasy creates a website package file (a TXT file) with information about which files to transfer to the remote computer.
1 On the Publish tab, click Build, or choose Export>Website from the WebEasy menu.
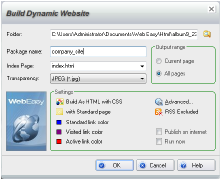
2 In the Build Dynamic Website dialog box, click the Browse button for the Folder box. In the Choose Folder dialog box, locate and select a folder for storing the website files. Click Open. (You can also type the path.)
Note: WebEasy places all the files required to view the website, such as the HTML files, the graphics files, and any other necessary files (depending on the type of website) into this folder.
3 In the Package name box, change the document name, if you wish, to a name for the website package.
In general, only use lower-case letters and use the underscore ( _ ) character to separate words. Do not use spaces or non-alphanumeric characters in the name.
4 Select the Output range:
Current page creates a website only for the current page.
All pages creates a website that includes every page in the document.
5 If necessary, change the name for the main page in the Index Page box. (The web hosting service may require the main page to be something other than index.html.)
6 If necessary, change the image file type for determining which file have transparency: JPEG, GIF, or PNG.
7 Click the Build As button and specify the type of website to build: XHTML with CSS, HTML with CSS, Dynamic HTML, or Simple HTML.
8 Click the with button and specify the type of pages for your website:
For XHTML with CSS or HTML with CSS, specify how to position the pages:
Standard Page displays the website at the top left of the browser.
Centered Full Page displays the pages in the center of the browser’s window with the any texture or gradient background showing in the center, but the extra space is filled with a solid background color.
Centered Transparent Page displays the pages in the center of the browser’s window with any texture or gradient background filling the extra space.
For Dynamic HTML, you can specify positioning or add navigation by page numbers or icons to the pages. You can also have the pages divided into frame sets.
For Simple HTML, you can specify no additional navigation or have page numbers or icons for navigation. If this is an eBay page, specify Source for eBay sellers.
9 Specify colors for linked text.
To set or change the color of Standard, Visited, and Active links, click the appropriate color block and select a color. For details see “Specifying Colors”.
10 Click the Advanced button to personalize your website by specifying the color palette or scroll bar availability.
11 Click the RSS button to set RSS channel settings.
If you do not have RSS set up, leave this set as RSS Excluded. For information about RSS, see “Adding RSS”.
12 Select the Publish on Internet check box if you are connected to the Internet, have the relevant details from your web hosting service, and want to publish the website now.
After WebEasy creates the files, the Publish Assistant opens for you to upload the files immediately.
13 Select the Run Now check box to display the website in your browser after the HTML files have been built.
14 Select the Publish on Internet check box to open the WebEasy Hosting Services Publishing wizard after creating the website.
15 Click OK.
The build process takes a few moments, depending on the size of your website and speed of your computer.