Always place the table entirely inside the page of the document.
1 On the Insert and Modify tab, in the Insert section, click Table.
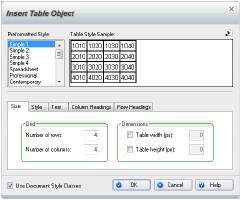
2 In the Insert Table Object dialog box, select a table style from the Preformatted Style list.
When you select a style, an example appears on the right.
3 Click the Size tab and type values in the Number of the rows and Number of columns boxes.
4 If needed, select a check box and then specify dimensions, in pixels, for the Table width or Table height.
5 To further customize the table, click the Style, Text, Column Headings, and Row Headings tabs and adjust the options as needed.
6 Click the Refresh button to update the preview to match your selections.
7 Click OK.
8 Move the pointer over the page and click to insert the table.
9 Double-click the table to type information into the cells. Use the arrow keys to move to adjacent cells.
10 When done, click outside the table.
To resize the boundary of the item to fit it to the contents, click the table.