You create and edit website documents in the workspace.
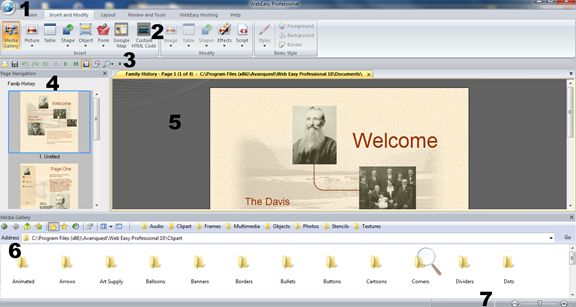
The numbers on the graphic match to a description below.
1 The WebEasy menu has basic commands to start a document, import a website, save your document, set options, and other important tasks,
2 The ribbon’s tabs have buttons and options for applying WebEasy features.
3 The Quick Access toolbar, below the ribbon by default, has the Undo and Redo buttons, page navigation buttons, and buttons for viewing the Inspector and previewing documents. You can customize the Quick Access toolbar by adding or removing buttons or moving it above the ribbon.
4 The Page Navigation pane shows thumbnails for each page in the document. Click a thumbnail to show that page in the workspace. You can show or hide this pane by clicking the Page Navigation Assistant button on the Quick Access toolbar.
5 You work on your website documents in the workspace area. Each open document has a tab showing the document’s file name. Click a tab to activate a document.
6 The Media Gallery pane gives you access to provided media and media files on your computer. You can show or hide this pane in the Options dialog box.
7 The status
bar at the bottom of the window shows status information and information
about the currently selected item on the page. If
you have not selected an item, information shows about the item underneath
the pointer. The second section shows the position of the selected item
(from the upper-left corner of the page in x and y coordinates) and the
size of the item on the page.
Use the Zoom slider to adjust
the view of the page. The current magnification shows to the left. Click
the value to specify an exact magnification.
See Also
Using_the_Ribbon_Tabs_and_Toolbars
Working_with_the_Media_Gallery