If you use the Publish Assistant or FTP Max to upload files, you use a standard profile (available for many ISPs) and customize it or create a profile for your hosting service.
Note: To connect to a profile, you must have an active Internet connection and details from your ISP or web hosting service.
1 On the Publish tab, in the 3rd Party Hosting section, click either Publish or Transfer Files.
2 In the Publish Assistant, click Next, select the folder to upload, click Next and then click Connect.
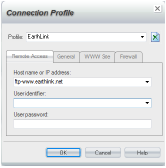
3 In the Connection Profile dialog box (from the Publish Assistant) or the Connect dialog box (from FTP Max), type a name in the Profile box.
4 On the Remote Access tab, type or confirm the Host name or IP address and the User identifier provided by your ISP.
5 If necessary, type your User password.
6 Click the General tab.

7 Type the folder for uploading the site in the Initial remote folder box (such as public or htmldocs).
The ISP or web hosting service should provide this information.
8 If necessary, type the path on your computer to the website package in the Initial local folder box.
WebEasy fills this in with the default location of C:\Users\user\Document\Web Easy\Html.
9 In general, leave the other options with their default values unless instructed to change them.
10 Click the Firewall tab.
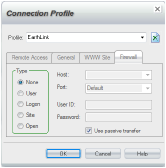
11 Select None if your computer isn’t behind a firewall.
■ If your computer is behind a firewall, ask your network administrator for the details to enter.
■ If you use None and experience problems, select Use a passive transfer.
12 Click the WWW Site tab, type the URL for
the website, and specify the Primary page.
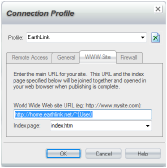
The name after the forward slash (/) is the folder name for the website files on the remote server. The primary page is the first page to appear when visitors view your website and often called the Home page.
Note: This tab is not available in the Connect dialog box.
13 Click OK.
Now you can select this profile name when using Publish Assistant or FTP Max.
For more details, click the Help button to view FTP Max Help.
See Also
Using the WebEasy Hosting Service
Using Another Web Hosting Service